The green overlay in a new fluid grid layout can be turned off by going to the Visual Aids icon (on same line as Split and Design views, to the right, a dotted square with and eye in front of it). Click the Visual Aids icon and then Deselect Fluid Grid Layout Guides to turn the green fill off.
shipping2=2.50
Change the “2.50” to whatever amount you want to be the shipping charge when more than one item is ordered.
Goes in “Advanced Variables” in “Customize Advanced Features” when creating PayPal button.
Must check option that customers can change the amount of the order.
Here is great link to How To Create Grass:
Use Photoshop and create a new document.
Set your foreground and background colors to black and white. A shortcut for this is to restore Photoshop’s color defaults by pressing ‘d’ on your keyboard.
Go to the toolbar at the top and click filter->render->clouds
Add some noise. Click filter->noise->add noise. Change the amount to 44%, the distribution to gaussian and make sure monochromatic is checked on.
Add a gaussian blur to the dirt layer. Click filter->blur->gaussian blur. Set the radius to 0.9 pixels.
Give the dirt layer it’s color. Click image->adjustments->hue/saturation. Make sure to check preview and colorize. Then change the setting to a nice brown. I used: Hue: 49, Saturation: 29, Lightness: -38. Click OK.
OK, we are now finished with the dirt layer. That gives us a nice texture and color underneath the grass we are about to create. Let’s start on the grass. Create a new layer and name it “Grass.”
Change your background color to a grassy color green, I used, #52782F. Hit ‘ctrl, backspace’ to fill your current layer (Grass) with the green color you selected.
Add some noise to your new grass layer. Click filer->add noise->noise. Choose 30% for the amount, gaussian for the distribution, and check monchromatic. Click OK.
Blur the grass layer. Click filter->blur->gaussian blur. Change the radius to 0.9 pixels, click OK.
Use a couple of wind filters to lengthen the grass and simulate the look of blades. Click filter->stylize->wind, and change the settings to: method, stagger and direction, from the right. Click OK.
Add a little more direction and interest to our layer. First click image->rotate canvas->90 CW. Click OK.
Repeat the last two steps now, but go in the opposite direction. So go to filter->stylize->wind again and choose stagger, from the left. Click OK.
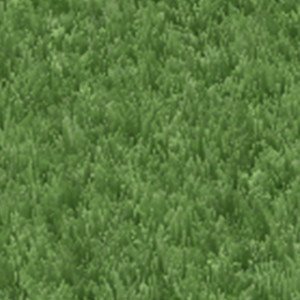
Now flip the image so the grass looks verticle. Click image->rotate canvas->90 CCW. Below is what I’ve got so far…
If grass could use a little more contrast, then change the levels by clicking image->adjustments->levels. Drag the white and black sliders towards the middle till you get the variance you are after. Click OK.
There you have it! Grass for all kinds of backgrounds.
Bulk Email
Here is one of the best ways that a bulk emailing is accomplished:
The spreadsheet containing all the email addresses should be saved as a .csv file.
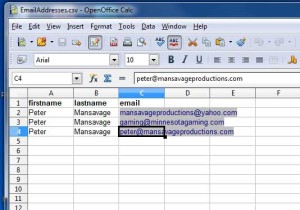
The spreadsheet should have a header row at the top of the spreadsheet, with recipients first name, last name, and email address, each as one word all lower case.
The above spreadsheet could be used to send 3 emails to me all at once.
Create a new email in your email program. I use Mozilla Thunderbird with Mail Merge add-on.
Copy & Paste the HTML code of the HTML email into the body of the email that you want to send to people listed in the spreadsheet. In Thunderbird, click Insert, choose HTML, then paste code into dialogue box.
In the To: entry, type {{email}}
(Enclose the column headings in 2 sets of curly braces.)
The Thunderbird program will automatically generate emails in the Outbox addressed to everyone in the “email” column of the spreadsheet.
If you type Dear {{firstname}} in the body of the mail, each email will have the first name of each person associated with the corresponding email address.
Choose Send Unsent Messages.
The best online converter that I have found to convert PDF files to HTML5 files is called Zamzar.
Their website is zamzar.com
The HTML
To show a video in HTML, use the <video> element (will not autoplay):
<video width=“320” height=“240” controls>
<source src=“movie.mp4” type=“video/mp4”>
<source src=“movie.ogg” type=“video/ogg”>
Your browser does not support the video tag.
</video>
The controls attribute adds video controls, like play, pause, and volume.
IInclude width and height attributes.
Text between the <video> and </video> tags will only display in browsers that do not support the <video> element.
Multiple <source> elements can link to different video files. The browser will use the first recognized format.
HTML5 Video Code
Working with HTML5 video in Dreamweaver
Encode video to MP4, Ogg, and WebM format.
Follow these steps to create a new HTML file in Dreamweaver and add video and source tags:
Open Dreamweaver and an HTML file.
Switch to Code view or Split view.
Add the following code inside the <body></body> tags:
<video autoplay="autoplay" controls="controls" preload="auto"> <source src="movie.mp4" type="video/mp4"> <source src="movie.ogv" type="video/ogg"> <source src="movie.webm" type="video/webm"> </video> Notice that the video tag specifies three parameters that preload the video when the page loads, auto-play the video when ready, and show the browser’s native controls. Nested between the open and close video tags are three source tags. The source tags define the MP4 video source, the Ogg video source, and the WebM video source. The browser chooses the source it can support. Note that the MIME type must be included for full support across browsers, and the MP4 type should come first to support iPad.
Save the file next to your videos or in the location of your choice.
Update the src attribute in the source tags with the path to your videos.
For poster:
<video controls poster=”demo.jpg”>
<source src=”demo.mp4″ type=”video/mp4″ />
<source src=”demo.webm” type=”video/webm”/>
<source src=”demo.ogv” type=”video/ogg”/>
<p>Fallback code if video isn’t supported</p>/
</video>
Float & Clear with CSS
Use the following to prevent text inside the editable region under a div with a menu bar from floating up along side the menu bar as it adjusts inside a fluid layout:
Use the “Float” property to specify whether or not an element should float.
Use the “Clear” property to control the behavior of floating elements.
Float Property
The “Float” property can be used to wrap text around images.
Clear Property
The “Clear” property is used to control the behavior of floating elements.
Elements after a floating element will flow around it. To prevent this, use the “Clear” property.
The “Clear” property specifies on which sides of an element floating elements are not allowed to float.
So for the div that contains the menu bar, float the div to the left and set the clear to “right.”
(Must use both.)
Choose GIF 32 No Dither from the Preset drop-down list.
Fee Website Analysis Form Code
Here is code from Network Solution for form:
<a href=http://0393faf.netsolhost.com/freegoogletest.html> Mansavage Productions Free Google Mobile Friendly Website Analysis</a>
Save.
